> ## Documentation Index
> Fetch the complete documentation index at: https://jam.dev/docs/llms.txt
> Use this file to discover all available pages before exploring further.
# MCP
> Pipe Jam bug context into Claude, Cursor, VS Code, and other AI coding tools. Your agent goes from bug to fix without copy-pasting.
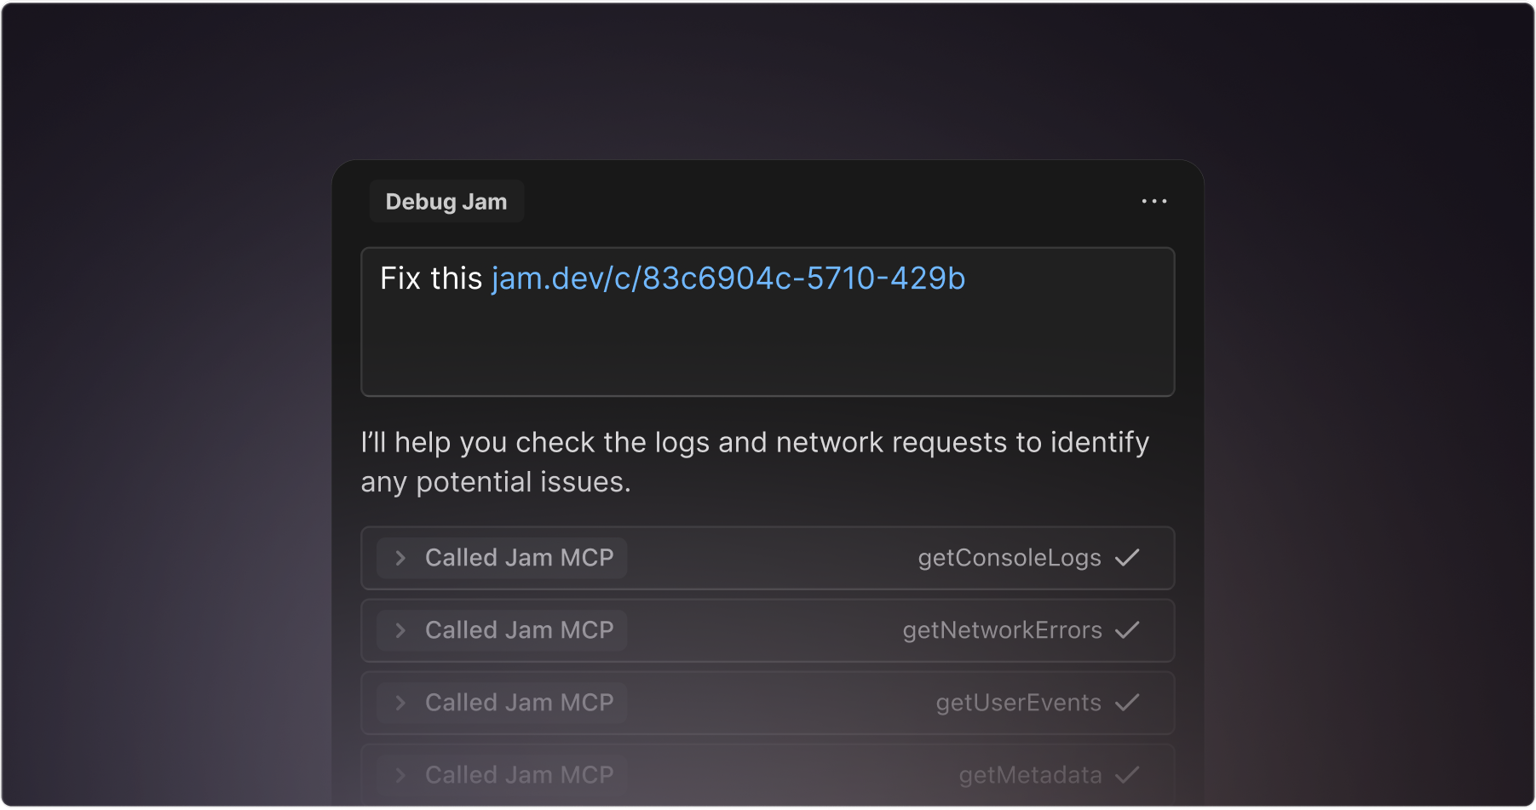 Jam MCP (Model Context Protocol) lets your AI coding tools open a Jam recording and automatically load its full context (video, user events, console logs, errors, and network requests) right where you're working. Paste a Jam link into any supported MCP client and the context flows directly to your agent.
Jam captures console logs, network requests, user events, and your chosen metadata automatically when you record. With MCP, that context flows into Claude Code, Cursor, VS Code, and Windsurf without copy-pasting.
## Prerequisites
You need a Jam recording before your agent can use MCP.
Install the [Chrome
extension](https://chromewebstore.google.com/detail/jam/iohjgamcilhbgmhbnllfolmkmmekfmci)
from the Chrome Web Store.
Hit **Record** to capture your screen and voice.
Stop the recording. Your Jam link is ready for an agent to consume via MCP.
## Step 1: Configure your MCP client
From the ChatGPT home page, go to **Settings**.
Click **Apps & Connectors**.
Select **Jam** and click the **Connect** button.
Sign in to Jam and allow access to your workspace.
From the Claude home page, click **search and tools** on web or desktop.
Click **+Add connectors**.
Find **Jam** in the Connector Directory and click the button to connect.
Sign in to Jam and pick the workspace Claude should access.
Install [Claude Code in your IDE](https://docs.anthropic.com/en/docs/claude-code/ide-integrations), then run the following command in your terminal:
```bash theme={"theme":"css-variables"}
claude mcp add Jam https://mcp.jam.dev/mcp -t http -s user
```
1. Open or create the config file at `~/.codex/config.toml`
2. Add the following to your config file and save:
```toml theme={"theme":"css-variables"}
[mcp_servers.jam]
url = "https://mcp.jam.dev/mcp"
```
Add the following to your Cursor MCP configuration:
```json theme={"theme":"css-variables"}
{
"mcpServers": {
"jam": {
"url": "https://mcp.jam.dev/mcp"
}
}
}
```
Restart Cursor after making this change for it to take effect.
Press `Ctrl`/`Cmd` + `P` and enter `>MCP: Add Server`.
Select **HTTP (HTTP or Server-Sent Events)**.
Enter `https://mcp.jam.dev/mcp`.
Enter `Jam`.
Your `mcp.json` file should look like this:
```json theme={"theme":"css-variables"}
{
"servers": {
"Jam": {
"url": "https://mcp.jam.dev/mcp",
"type": "http"
}
}
}
```
Press `Ctrl`/`Cmd` + `P` and enter `>MCP: Add Server`.
Select **HTTP (Server-Sent Events)**.
Enter `https://mcp.jam.dev/mcp`.
Enter `Jam`.
Your `mcp.json` file should look like this:
```json theme={"theme":"css-variables"}
{
"mcp": {
"servers": {
"Jam": {
"type": "http",
"url": "https://mcp.jam.dev/mcp"
}
}
}
}
```
Edit your `opencode.json`:
```json theme={"theme":"css-variables"}
{
"$schema": "https://opencode.ai/config.json",
"mcp": {
"jam": {
"type": "remote",
"url": "https://mcp.jam.dev/mcp"
}
}
}
```
Then run the following command to start the OAuth2 authorization flow:
```bash theme={"theme":"css-variables"}
opencode mcp auth jam
```
## Step 2: Start using Jam MCP
Once your MCP client is configured:
Copy one or more Jam links from your workspace.
Paste the Jam link into your agent's chat and describe what you need. See
the prompting tips and examples below.
Authenticate your IDE with Jam when prompted.
Approve any tool requests the agent makes as it reads your Jam data.
## Available MCP tools
| Tool | Description |
| -------------------- | ----------------------------------------------------------------------------------------------------------------- |
| `getDetails` | Get a quick snapshot of the Jam: who made it, what happened, and which other tools to try next. |
| `getConsoleLogs` | Grab the console logs from the Jam. Supports `logLevel` and `limit` filters to reduce noise. |
| `getNetworkRequests` | List every web request from the Jam as JSON. Supports `statusCode`, `contentType`, `host`, and `limit` filters. |
| `getScreenshot` | Get every screenshot from a screenshot Jam for visual inspection. |
| `getUserEvents` | Read each click, input, and page navigation change in plain language. |
| `getMetadata` | Read custom key-value metadata set via the `jam.metadata()` SDK: user IDs, app versions, feature flags, and more. |
| `getVideoTranscript` | Get the spoken transcript from a video Jam where the microphone was enabled, in WebVTT format with timestamps. |
| `analyzeVideo` | Analyze a Jam video recording to extract insights, detect issues, and provide structured feedback. |
| `listJams` | Search and filter Jams by text, type, folder, author, URL, or date. |
| `listMembers` | Browse your team members. |
| `listFolders` | Browse available folders. |
| `createComment` | Add Markdown comments to a Jam. |
| `updateJam` | Move Jams between folders using a folder ID or folder name. |
`getScreenshot` and `analyzeVideo` are not available for Instant Replay Jams.
All other MCP tools work and return data for Instant Replay Jams.
## Prompting tips
* Use Jam MCP to help with bug analysis, product feedback, and giving agents the context they need to debug issues.
* Be as specific as you would with another engineer for the best results.
* Start with small features or bug fixes. Tell your agent to propose a plan using Jam MCP and verify its plan before moving on to suggested edits.
## Examples
Here are three ways the team at Jam uses Jam MCP in their own workflow.
### Bug analysis
**Tomasz (Product Engineer)** uses Jam MCP to debug issues by providing bug context to Cursor to ship a fix.
```text theme={"theme":"css-variables"}
Review this Jam [Jam Link] and analyze the problem, cross-reference it with the existing codebase, and prepare a detailed plan for implementation.
```
Stack: Jam recordings + Jam MCP + Cursor
***
### Product feedback triage
**Frits (Product Manager)** lets Claude review and analyze customer Jams to spot common issues and patterns, then turns findings into grouped Linear tickets.
```text theme={"theme":"css-variables"}
Analyze these Jams, perform root-cause analysis, and organize them into efficient work packages to minimize engineers' context switching; create Linear tickets from the analysis.
[Jam Link]
```
Stack: Jam customer recordings + Jam MCP + Claude Desktop + Linear MCP
***
### Implementation planning from design feedback
**Martin (Product Designer)** records product and design feedback with the Jam extension. Jam MCP provides the context for Claude Code to plan and ship a ready-to-review PR.
```text theme={"theme":"css-variables"}
I recorded product feedback in a Jam. Create an implementation plan for the changes requested in this Jam:
[Jam Link]
```
Stack: Jam extension + Jam MCP + Claude Code inside Cursor
## Managing MCP access
Go to [**Settings → MCP**](https://jam.dev/s/settings/mcp) to see connected tools. Select any tool to revoke or disconnect access at any time.
MCP mirrors your existing Jam permissions. It does not grant new access beyond
what a user can already see in the Jam web or mobile apps. Use your normal
admin controls for members and roles, or SSO in
[**Settings**](https://jam.dev/s/settings).
## FAQ
Yes. You only need an existing Jam link. Anyone (you, your workspace, or a
customer) can record a Jam. If you want to record and create new Jams
yourself, install the Chrome extension or use the iOS app.
Yes. You can paste more than one link, but we recommend one Jam at a time so
your agent doesn't hit context window limits.
Some MCP tools use Google's Gemini. Jam opts out of training on customer
data and takes steps to de-identify it. See the [Security page](/security)
for more details on Jam's AI data policy.
Not exactly. `getScreenshot` and `analyzeVideo` are not available for
Instant Replay Jams. All other MCP tools still work and return data and
context.
MCP mirrors your existing Jam permissions. It doesn't grant new access. Use
your normal admin controls for members and roles, or SSO in
[**Settings**](https://jam.dev/s/settings). Nothing is exposed via MCP that
a user couldn't already see in the Jam web or mobile apps.
Jam MCP (Model Context Protocol) lets your AI coding tools open a Jam recording and automatically load its full context (video, user events, console logs, errors, and network requests) right where you're working. Paste a Jam link into any supported MCP client and the context flows directly to your agent.
Jam captures console logs, network requests, user events, and your chosen metadata automatically when you record. With MCP, that context flows into Claude Code, Cursor, VS Code, and Windsurf without copy-pasting.
## Prerequisites
You need a Jam recording before your agent can use MCP.
Install the [Chrome
extension](https://chromewebstore.google.com/detail/jam/iohjgamcilhbgmhbnllfolmkmmekfmci)
from the Chrome Web Store.
Hit **Record** to capture your screen and voice.
Stop the recording. Your Jam link is ready for an agent to consume via MCP.
## Step 1: Configure your MCP client
From the ChatGPT home page, go to **Settings**.
Click **Apps & Connectors**.
Select **Jam** and click the **Connect** button.
Sign in to Jam and allow access to your workspace.
From the Claude home page, click **search and tools** on web or desktop.
Click **+Add connectors**.
Find **Jam** in the Connector Directory and click the button to connect.
Sign in to Jam and pick the workspace Claude should access.
Install [Claude Code in your IDE](https://docs.anthropic.com/en/docs/claude-code/ide-integrations), then run the following command in your terminal:
```bash theme={"theme":"css-variables"}
claude mcp add Jam https://mcp.jam.dev/mcp -t http -s user
```
1. Open or create the config file at `~/.codex/config.toml`
2. Add the following to your config file and save:
```toml theme={"theme":"css-variables"}
[mcp_servers.jam]
url = "https://mcp.jam.dev/mcp"
```
Add the following to your Cursor MCP configuration:
```json theme={"theme":"css-variables"}
{
"mcpServers": {
"jam": {
"url": "https://mcp.jam.dev/mcp"
}
}
}
```
Restart Cursor after making this change for it to take effect.
Press `Ctrl`/`Cmd` + `P` and enter `>MCP: Add Server`.
Select **HTTP (HTTP or Server-Sent Events)**.
Enter `https://mcp.jam.dev/mcp`.
Enter `Jam`.
Your `mcp.json` file should look like this:
```json theme={"theme":"css-variables"}
{
"servers": {
"Jam": {
"url": "https://mcp.jam.dev/mcp",
"type": "http"
}
}
}
```
Press `Ctrl`/`Cmd` + `P` and enter `>MCP: Add Server`.
Select **HTTP (Server-Sent Events)**.
Enter `https://mcp.jam.dev/mcp`.
Enter `Jam`.
Your `mcp.json` file should look like this:
```json theme={"theme":"css-variables"}
{
"mcp": {
"servers": {
"Jam": {
"type": "http",
"url": "https://mcp.jam.dev/mcp"
}
}
}
}
```
Edit your `opencode.json`:
```json theme={"theme":"css-variables"}
{
"$schema": "https://opencode.ai/config.json",
"mcp": {
"jam": {
"type": "remote",
"url": "https://mcp.jam.dev/mcp"
}
}
}
```
Then run the following command to start the OAuth2 authorization flow:
```bash theme={"theme":"css-variables"}
opencode mcp auth jam
```
## Step 2: Start using Jam MCP
Once your MCP client is configured:
Copy one or more Jam links from your workspace.
Paste the Jam link into your agent's chat and describe what you need. See
the prompting tips and examples below.
Authenticate your IDE with Jam when prompted.
Approve any tool requests the agent makes as it reads your Jam data.
## Available MCP tools
| Tool | Description |
| -------------------- | ----------------------------------------------------------------------------------------------------------------- |
| `getDetails` | Get a quick snapshot of the Jam: who made it, what happened, and which other tools to try next. |
| `getConsoleLogs` | Grab the console logs from the Jam. Supports `logLevel` and `limit` filters to reduce noise. |
| `getNetworkRequests` | List every web request from the Jam as JSON. Supports `statusCode`, `contentType`, `host`, and `limit` filters. |
| `getScreenshot` | Get every screenshot from a screenshot Jam for visual inspection. |
| `getUserEvents` | Read each click, input, and page navigation change in plain language. |
| `getMetadata` | Read custom key-value metadata set via the `jam.metadata()` SDK: user IDs, app versions, feature flags, and more. |
| `getVideoTranscript` | Get the spoken transcript from a video Jam where the microphone was enabled, in WebVTT format with timestamps. |
| `analyzeVideo` | Analyze a Jam video recording to extract insights, detect issues, and provide structured feedback. |
| `listJams` | Search and filter Jams by text, type, folder, author, URL, or date. |
| `listMembers` | Browse your team members. |
| `listFolders` | Browse available folders. |
| `createComment` | Add Markdown comments to a Jam. |
| `updateJam` | Move Jams between folders using a folder ID or folder name. |
`getScreenshot` and `analyzeVideo` are not available for Instant Replay Jams.
All other MCP tools work and return data for Instant Replay Jams.
## Prompting tips
* Use Jam MCP to help with bug analysis, product feedback, and giving agents the context they need to debug issues.
* Be as specific as you would with another engineer for the best results.
* Start with small features or bug fixes. Tell your agent to propose a plan using Jam MCP and verify its plan before moving on to suggested edits.
## Examples
Here are three ways the team at Jam uses Jam MCP in their own workflow.
### Bug analysis
**Tomasz (Product Engineer)** uses Jam MCP to debug issues by providing bug context to Cursor to ship a fix.
```text theme={"theme":"css-variables"}
Review this Jam [Jam Link] and analyze the problem, cross-reference it with the existing codebase, and prepare a detailed plan for implementation.
```
Stack: Jam recordings + Jam MCP + Cursor
***
### Product feedback triage
**Frits (Product Manager)** lets Claude review and analyze customer Jams to spot common issues and patterns, then turns findings into grouped Linear tickets.
```text theme={"theme":"css-variables"}
Analyze these Jams, perform root-cause analysis, and organize them into efficient work packages to minimize engineers' context switching; create Linear tickets from the analysis.
[Jam Link]
```
Stack: Jam customer recordings + Jam MCP + Claude Desktop + Linear MCP
***
### Implementation planning from design feedback
**Martin (Product Designer)** records product and design feedback with the Jam extension. Jam MCP provides the context for Claude Code to plan and ship a ready-to-review PR.
```text theme={"theme":"css-variables"}
I recorded product feedback in a Jam. Create an implementation plan for the changes requested in this Jam:
[Jam Link]
```
Stack: Jam extension + Jam MCP + Claude Code inside Cursor
## Managing MCP access
Go to [**Settings → MCP**](https://jam.dev/s/settings/mcp) to see connected tools. Select any tool to revoke or disconnect access at any time.
MCP mirrors your existing Jam permissions. It does not grant new access beyond
what a user can already see in the Jam web or mobile apps. Use your normal
admin controls for members and roles, or SSO in
[**Settings**](https://jam.dev/s/settings).
## FAQ
Yes. You only need an existing Jam link. Anyone (you, your workspace, or a
customer) can record a Jam. If you want to record and create new Jams
yourself, install the Chrome extension or use the iOS app.
Yes. You can paste more than one link, but we recommend one Jam at a time so
your agent doesn't hit context window limits.
Some MCP tools use Google's Gemini. Jam opts out of training on customer
data and takes steps to de-identify it. See the [Security page](/security)
for more details on Jam's AI data policy.
Not exactly. `getScreenshot` and `analyzeVideo` are not available for
Instant Replay Jams. All other MCP tools still work and return data and
context.
MCP mirrors your existing Jam permissions. It doesn't grant new access. Use
your normal admin controls for members and roles, or SSO in
[**Settings**](https://jam.dev/s/settings). Nothing is exposed via MCP that
a user couldn't already see in the Jam web or mobile apps.